Our first day here was very stressful... the move was crazy, everything was (is) disorganized, and the cats didn't react that great.
Quick side bar - Paul hid in a closet most of the day and Michael hissed at Paul, ran under the bed, and then hissed at me. Neither were too happy about the change! However, they are both getting better and seem to be coming around to the whole house thing.
Anyways, back to the reason of the post - thanks to my Mom! She came over on Monday and really helped me get the living room in a good place. It's nice to have at least one room looking good!

Tuesday, June 11, 2013
Moving day
On Saturday, we said goodbye to Dallas, and hello to Rockwall! It was strange leaving the apartment – it felt a little like the last day of high school. You think it will be this grand, Grease-like celebration, but you just kinda leave and that's that.
Unfortunately, the moving process was a bit stressful...
Saturday, June 8, 2013
Thursday, May 30, 2013
Decorations!
Now that we are nearing our move-in date, I've started to think about decorations! Hooray! I checked out Homegoods recently and found a few things I may pick up in the next few weeks. What do you think?
Sunday, May 26, 2013
Kitchen finale
The kitchen is cooked and done! Well, at least with what needed to get done before we move in.
We decided to paint it with both paint colors that we are using throughout the house. They are in the same family, so they look very similar.
We decided to paint it with both paint colors that we are using throughout the house. They are in the same family, so they look very similar.
It's almost time to move!
We made some great progress over the past two weeks. I'm happy to say that the house is really close to move-in ready! Here are some updates on what has been done...
Monday, May 20, 2013
Floors - Part I
This weekend, we saw part of the new floors come in! New carpet will be installed later this week...


Sunday, May 12, 2013
Only three working weekends left!
We are only three weekends away from moving - ahh! It is exciting and nerve wracking at the same time. One thing I know I'm looking forward to is having a weekend back. Not having a Saturday or Sunday to relax takes it's toll.
Anyways, this weekend wasn't a dramatic change type of weekend. Instead, there was a lot of prepping... I think next weekend will be very productive!
Anyways, this weekend wasn't a dramatic change type of weekend. Instead, there was a lot of prepping... I think next weekend will be very productive!
Monday, May 6, 2013
Interesting find
While smoothing out the foyer walls (we're keeping them a smooth texture). I discovered something.
I thought that the previous owners had wallpapered as they built the house. But, while working near a socket, I saw that the walls used to be textured, and they put a skim coat over it before wallpapering!
Gosh they loved wallpaper...

I thought that the previous owners had wallpapered as they built the house. But, while working near a socket, I saw that the walls used to be textured, and they put a skim coat over it before wallpapering!
Gosh they loved wallpaper...

-T
Sunday, May 5, 2013
Kitchen update
After last week, we were ready to get the kitchen in a more semi-finished state with normal walls. Our drywall skim coat dried well. We had to scrape off any larger bumps and then wet sanded to make sure we had a smooth surface for the texture.
Prep work took FOREVER. Literally at least five hours...
Once that was done, Rob could put texture up. Jonathan and Sharon helped out while Mom, Dad, and I worked on other projects around the house.
First, Rob mixed until he had the perfect texture, then he used the hopper ("the hoppa!") to spray the texture on the walls. After about 20 minutes he knocked down the texture to finish the effect. All in all, it looks great! We are excited to start painting next weekend.


Floor trials
This weekend was the weekend to tackle the floors, or at least start. We had already pulled up the carpet and determined that it might be in good enough condition to stain or paint.
We ripped the carpet, padding, and carpet tack in the master closet and bathroom to start. It was doable, but it took me a good hour to pry up the carpet tack... in those tiny rooms! I started walking around and got a little overwhelmed with the amount of carpet that needed to come out.


We ripped the carpet, padding, and carpet tack in the master closet and bathroom to start. It was doable, but it took me a good hour to pry up the carpet tack... in those tiny rooms! I started walking around and got a little overwhelmed with the amount of carpet that needed to come out.


Monday, April 29, 2013
Water works
So after a looooong weekend of making progress, we hit a snag. We had to move the fridge multiple times to take off wallpaper and put drywall mud up. The problem? The ice maker was hooked up using an old copper wire. Nowadays they use flexible tubing so it doesn't crack.
Since it was copper... it cracked.


Since it was copper... it cracked.


Drywall, step one
After the wallpaper came down in the kitchen, we had to put a layer of drywall mud (joint compound) up so the drywall texture has something to stick to, and so major divots and holes were covered up.
Thankfully Rob has done this before, so we soon made quick work of the kitchen.

Thankfully Rob has done this before, so we soon made quick work of the kitchen.

Paint, paint, and more paint!
A few more coats of paint went up this past weekend. Here is the office/guest bedroom:

And our bedroom. So. much. better. than. teal.


And our bedroom. So. much. better. than. teal.

-T
Wallpaper wars
Over the past few weeks, we've been in a battle with the large amounts of wallpaper in our home.
The foyer went down without a fight, which, in hindsight gave us false hope about what was to come.

The foyer went down without a fight, which, in hindsight gave us false hope about what was to come.

Sunday, April 21, 2013
Kitchen Nightmares
Our kitchen was decorated using a teal plaid wallpaper. Obviously this has to go.

Unfortunately it is putting up quite the fight...
.JPG)
.JPG)
.JPG)
This is after three people (Sharon, Rob, and Jon) worked on it for hours. The reason it is so much harder than the foyer is because the drywall wasn't prepped before wallpaper was applied. See the white lines? That's drywall skim... the brown is the dry wall itself, which has a paper topping that the wallpaper is basically super glued to. Great!
Next weekend we are going to work to get the rest of the teal off, and Rob (thankfully) has finished drywall before so we'll cover the rest of the wall with drywall mud at a future point in time.
Definitely a work in progress!
Weekend #2 Updates
A couple of updates - the office/front bedroom and our master bedroom have been primed - hooray!
.JPG)
.JPG)
We also have a new friend... can you spot him!?

.JPG)
.JPG)
We also have a new friend... can you spot him!?

It takes two (coats of paint)
On Friday we started to apply paint to the dining room and on Saturday, tackled the living room. Great progress, but we ran into some issues.
We went back to the store to buy another gallon of the metallic paint (because it was still streaking after two coats), and found out that we actually should have put a coat of an opaque base paint first, then applied the metallic coating. Thankfully we were able to get the new gallons of paint for free since we didn't realize/weren't told about the mishap beforehand. That being said, the bronze in the dining room will return, but now its been covered by the base coat.
.JPG)
.JPG)
We had also painted the living room using Valspar's Lyndhurst Gallery Beige which mysteriously turned pink. When it dried it looked like a dusty rose, mauve-y color. It was terrible. Another paint run and the problem was fixed!
.JPG)

.JPG)
So a couple of missteps, but it's still coming together!
We went back to the store to buy another gallon of the metallic paint (because it was still streaking after two coats), and found out that we actually should have put a coat of an opaque base paint first, then applied the metallic coating. Thankfully we were able to get the new gallons of paint for free since we didn't realize/weren't told about the mishap beforehand. That being said, the bronze in the dining room will return, but now its been covered by the base coat.
.JPG)
.JPG)
We had also painted the living room using Valspar's Lyndhurst Gallery Beige which mysteriously turned pink. When it dried it looked like a dusty rose, mauve-y color. It was terrible. Another paint run and the problem was fixed!
.JPG)
Dusty rose color on the right, new color (Swoosh, Valspar) on the left.

.JPG)
So a couple of missteps, but it's still coming together!
Ding dong, the braid is dead
In addition to wallpaper and paint color issues, the previous owners left a lot of their wall treatments. While stylish at one point, they were now heavy, dirty, dust magnets.
The most notorious window dressing was the braid in the living room. A braid a fabric that basically rendered the shutters useless because once you opened them, they wouldn't close. Thanks to Dad for destroying it!!
.JPG)
.JPG)
.JPG)
The most notorious window dressing was the braid in the living room. A braid a fabric that basically rendered the shutters useless because once you opened them, they wouldn't close. Thanks to Dad for destroying it!!
.JPG)
.JPG)
.JPG)
Friday, April 19, 2013
First coat of paint
We didn't have a ton if time to work today, but we did buy paint and started to put it on the walls! The first room to get a coat was the dining room - Valspar Shimmering Bronze. We are going to put a second coat on tomorrow, but it is starting to look pretty sharp.


Sunday, April 14, 2013
Day Two - Dining Room
In addition to the foyer, we also started to tackle the dining room. Since it is one of the first rooms you see when you walk in, we wanted to get going on it's transformation.
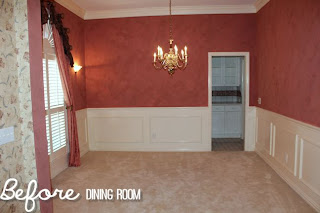

So, it was pink. The previous owners also left the window treatments, which were great quality, just not our style. The plan of attack was to fill nail holes, take down the wall treatment, and start to prime everything.
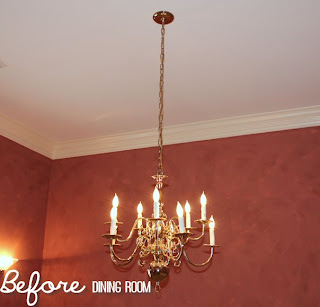
Another feature was the chandelier. My main concern was that it had a bright brass finish. I saw a post on Young House Love that inspired me. I decided to try to spray paint it into a more modern, cool, attractive chandelier.
Since we don't plan on keeping the carpet, we decided to paint it in the same room. I used an awesome product - Rustoleum's Oil-Rubbed Bronze.

This stuff is awesome! After a few sprays, the chandelier was transformed!


And the carpet? Well, it didn't look like it was affected until I moved a few things...
.JPG)
Whoops! Looks like the carpet is really coming out!
Back to the room. Well the pink had to go, so we started with primer and decided on paint colors for the whole house.


From left to right (all Valspar):
1. Smoked Oyster
2. Oatlands Subtle Taupe
3. Asiago
4. Summer Gray (bottom, trim)
I'm thinking Smoked Oyster for the dining room and Oatlands for the foyer - we'll see!


So, it was pink. The previous owners also left the window treatments, which were great quality, just not our style. The plan of attack was to fill nail holes, take down the wall treatment, and start to prime everything.

Another feature was the chandelier. My main concern was that it had a bright brass finish. I saw a post on Young House Love that inspired me. I decided to try to spray paint it into a more modern, cool, attractive chandelier.
Since we don't plan on keeping the carpet, we decided to paint it in the same room. I used an awesome product - Rustoleum's Oil-Rubbed Bronze.


And the carpet? Well, it didn't look like it was affected until I moved a few things...
.JPG)
Whoops! Looks like the carpet is really coming out!
Back to the room. Well the pink had to go, so we started with primer and decided on paint colors for the whole house.


From left to right (all Valspar):
1. Smoked Oyster
2. Oatlands Subtle Taupe
3. Asiago
4. Summer Gray (bottom, trim)
I'm thinking Smoked Oyster for the dining room and Oatlands for the foyer - we'll see!
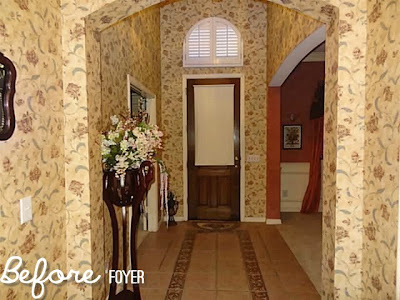
Day Two - Foyer
We started in the front of the house. The dining room and foyer are the first things you see when walking in, so we tackled those first. First things first - get rid of that wallpaper! It just wasn't our style.
While looking at paint colors, we struck up a conversation with a employee at the home improvement store who gave us some really helpful tips on how to take down wallpaper:
1. Score the paper using a wallpaper scorer. The one we used was effective but squeaked - next time, buy earplugs!
2. Grab a spray bottle and create a mix of liquid dish detergent (like Dawn) and water. You really only need about a tablespoon of detergent, the rest water
3. Saturate the walls. We sprayed them three to four times letting it dry each time in-between
4. Saturate again then peel off the wallpaper (hopefully!). Overall we had pretty good success taking off the paper, which was awesome

.JPG)
Here are a few before and after (in progress) shots of the foyer:


It was a great start! Here are next steps:
1. Decide how to finish the walls. We're thinking use joint compound to apply a texture
2. Prime and paint the walls
Eventually I'd like to replace the light fixture and do something with the tile, but those are future, after we move-in projects.
Subscribe to:
Posts (Atom)